Custom Robots Header Tags Settings In Blogger For Better SEO
Enable custom robots header tags Blogger settings for best SEO practice. Custom robots header tags will help you to increase Blogger blog's organic traffic.
 |
| Custom Robots Header Tags Blogger Settings |
Search engine optimization helps the search engine bots to easily crawl and index websites around the internet. So it is very necessary to improve the SEO of a website or blog.
SEO keeps evolving, to get updated with the latest SEO trends, Google Blogger/Blogspot is regularly adding new SEO features. This time, they have added custom robots header tags in Blogger. You can see the custom robots header tags settings in Search preference option in Blogger settings.
Most of the new bloggers who starts their blogging journey with Google Blogspot does not change these custom robots header tags settings as per best SEO practice. Due to this, their blog doesn't get indexed fast and they don't get any organic traffic.
Pro Tip: Create and submit XML Sitemap for Blogger to major search engines
Pro Tip: Create and submit XML Sitemap for Blogger to major search engines
In this post, I will show you the custom robots header tags Blogger settings for best SEO practice which will help you to increase the organic traffic of your blog.
What are custom robots header tags for Blogger?
Robots header tags also known as X-Robots-Tags deals with crawling and indexing of Blogger blog. These tags are also considered as Advance SEO settings for Blogger.
If you change those settings on your own, without knowing what the change will do to your blog then it can very bad impact on your blogs organic traffic. Changing a few settings can also force search engine bots to not to index your website or blog.
What are the several custom robots header tags settings in Blogger?
There are several custom robots header tags settings available inside search preference option in Blogger settings. I have tried to explain the use of custom robots header tags for Blogger, check below.
All: This setting is enabled by default in for pages and posts in Blogger. means there are no restrictions to search engine bots for crawling and indexing. The bots can freely crawl and index our blog.
Noindex: If you select this setting for any page or post in your blog, then the robots can not crawl and index that specific page. It simply means search engine bots will not index this specific page or post.
Nofollow: By default, Blogger adds dofollow attribute to links that you enter in your blog. Bots will follow the links and will consider them for rankings. By adding the nofollow tag to a specific post or page, you are telling search engine bots not to follow links on the specific post or page of your blog.
None: It combines noindex and nofollow tag. By selecting this setting, the search engine won't index your post or page and won't follow the links available on that specific post or page.
Noarchive: Choosing this setting will instruct search engines to not to show cached post or page in search results.
Nosnippet: This setting will remove the meta description snippet from the search results.
Noodp: Selecting this option will instruct search engines not to use metadata i.e meta title and meta description from open directory projects.
Notranslate: It will tell the search engine bots do not offer to translate the specific post or page into search engines results.
Noimageindex: If this option selected, your post will be crawled and indexed but the images used will not get indexed.
Unavailable_after: This setting instructs the search engine bots that the specific post or page will not be available after specified date/time.
I hope you have understood what are the custom robots header tags in Blogger and how they work.
How to change custom robots header tags settings in blogger?
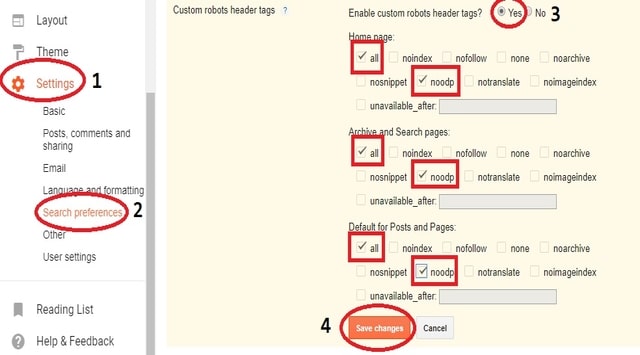
Follow the below steps to change and enable custom robots header tags for Blogger.1. Log into your Blogger account and go to dashboard.
2. Go to Settings and click on Search Preference option.
3. By default custom robots header tags will be disabled, you have to click on edit and then click on yes to enable the settings.
4. Now select only those options which are selected in the image below and then click on save changes.
Conclusion
I hope with the help of this post you have understood different types of custom robots header tags settings in Blogger.
If you have any questions or have suggestions regarding blogging then please do share with us in the comments section below.
I hope you like this tutorial on Custom Robots Header Tags Blogger Settings, please share this post by clicking on any one of the icons below!

1 comment